
ENGINE CONTROL UNIT (ECU) & DO-IT YOURSELF ECU REPAIRS??
Throughout
the past 15 years I’ve been a business associate and close mate of Chris, from
Meek Automotive. In this time,
I have been asked by numerous people in the industry including Chris to write an
article about the repair and restoration of ECU’s (and other vehicle computer
based control systems).
The reasons
for these requests are varied and numerous; yet all required something that
would assist, show, demonstrate and one hopes, explain a number of things, in
particular; -
1.
If you own
a Mitsubishi vehicle model between 1989 and 1994, why you should get the
capacitors changed.
2.
Why it’s
probably not that wise to do it yourself and furthermore why your average TV repairman can’t do it.
3.
And in
addition what happens when you try to put a “Chip” in and things go wrong !*#!^
So to give you a brief run down on my history, I started in
1990 as development engineer designing and manufacturing test equipment for auto
electricians to diagnose and repair faults in a wide variety of
vehicles.
In 1998 I
moved to sunny QLD and started work for an company -
testing and diagnosing faults in computer based automotive equipment such as
Engine Control Units (ECU’s); Transmission Control Units; Traction control
units; Climate control units; and Body control units. Working
on everything from the top end Ferrarri, Maserati, Porche, Rolls Royce through
to Camira, Commodore, Magna, Lancer and Falcon.
Apart from
that I have also worked on a countless number of units with every shape colour
and type of fault imaginable. But one of the biggest causes of irreparable
faults is a tricky little bug I call “Dirty Fingers” of which I will explain
more later. This cunning and sometimes devastating little
bug has a sneaky bedmate, “Lame Excuse” which is normally uttered to cover the
tracks of “Dirty Fingers”.
Some examples of “Lame Excuse” are ‘It was like that’, or
‘I took it to this guy and now it doesn’t work…’ you get the picture. Funny as
it seems, quite a bit of amusement can be had from some of the more creative
examples of “Lame Excuse”.
Recently though a resurgence of a close relative of the
“Lame Excuse” the “Oh Mate”, with such stunning examples as -
“Oh Mate,
can’t you do it cheaper”,
“Oh Mate, I have a mate that could fix it for half that price”,
“Oh Mate, It can’t be that much, I can buy a new one for
half that”
and
my personnel favourite
“Oh Mate,
It can’t be that hard, there’s nothing in there!”
All of
which spurred me to put this in writing – and to show you why you should have
your ECU’s (and more particularly Mitsubishi ECU’s) repaired, professionally by an experienced
technician.
If you own a Mitsubishi vehicle model
between 1989 and 1994, why you should get the capacitors
changed
1.
Big Bang
Theory
If you own a Mitsubishi vehicle model between 1989 and 1994, this is why you should get the capacitors changed!
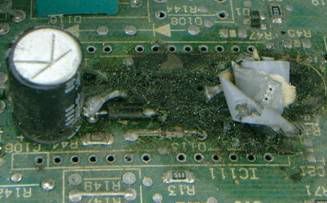
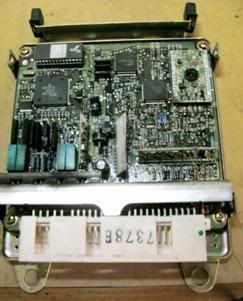
Figure 1.
Mitsubishi TR Magna 1991 ECU after “Big Bang” (Hybrids IC110 & 111 removed
for clarity)
In Figure 1. is what remains of a Magna ECU that didn’t have it’s capacitors changed. Note the large diode that normally sits in the middle of the board and third capacitor have been completely disintegrated (Refer to Figure 4 below). This is what can happen to ALL Mitsibishi ECU’s & TCU’s manufactured between 1989 & 1994, local & import. Unfortunately for the customer they didn’t know about the problems until too late. The ECU was damaged beyond repair and the customer was charged over $2000 for a genuine replacement (in 2000)
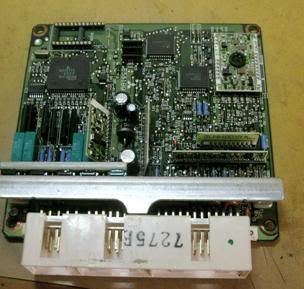
Figure 2. Mitsubishi GSR Lancer 1992
Main Processor after “Big Bang”
Figure 2.
shows what else can happen when “Big Bang” happens. In this case the owner of
the vehicle had a funny ‘electrical and fishy’ smell in his car for weeks and
didn’t get it attended to when finally “Big Bang” occurred. In this case the
damage to the circuit board was not as bad as in Figure 1. but the Processor shown above had completely blown its
top.
These are
some of the more extreme cases of what can happen, but don’t be fooled by ‘a
little bit of damage’. Seven out of ten ECU’s that had
blown processors only had minimal capacitor damage, yet the processor (which
does all the work) had been destroyed completely, rendering the ECU unable to be
repaired.
I hear another “Oh Mate” coming on… No, you just cant go down to your Dick Smith or Jaycar and buy replacements, these are custom made chips made for Mitsubishi Automotive by Mitsubishi Electronics and were never available as spare parts.
 Along with
the larger components that are damaged, there are also many miniature components
that are also damaged the event of major component failure.
Along with
the larger components that are damaged, there are also many miniature components
that are also damaged the event of major component failure.
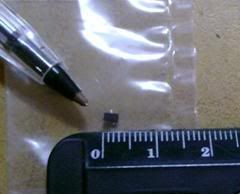
Figure 3. Typical
surface mount transistor
The
transistor shown in Fig 3 is just 2.8mm wide and each of the three legs are less than half a millimetre wide. You can imagine how
much damage a component failure like in Figure 1. would
do to these components and the circuit board that they are soldered to. Some
tracks on the circuit board are only about 2 to 3 times the thickness of a human
hair.
2.
“She’ll Be
Right” Slow Ooze Theory
This is another reason if you own a Mitsubishi vehicle
model between 1989 and 1994, why you should get the capacitors
changed!
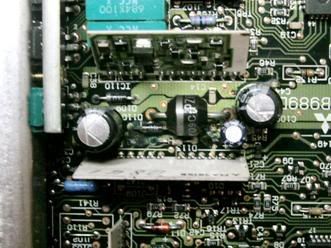
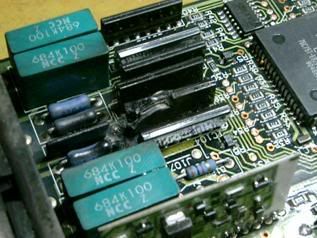
Figure 4.Classic example
of the “Slow Ooze” of electrolyte from the capacitors that will eventually lead
to “Big Bang”
Figure
4.Shows a
textbook example of what happens when the capacitors leak electrolyte over the
circuit board and other components. The owner of this vehicle knew about the
problem and left it, since the car was running and didn’t think it was a
problem.
This is the
usual problem, “she’ll be right”, “it hasn’t stoped on me yet” and another favourite ”Oh Mate”…. “It cant be
that hard, there’s not much damage in there!”
If you let
it go and you are lucky enough not to be a victim of “Big Bang”, the “Slow Ooze”
will eventually get you!
Below in Figure 5. isa picture of how far the “Slow Ooze” went and how many components had to be removed just to clean up the mess the leaked capacitor electrolyte made. Each component in the effected area had to be removed, (which could also damage both the board and component) to clean the board. Then each and every component either has to be replaced with new ones (which is the case with the capacitors, resistors, diodes and some of the surface mount components) or it has to be throughly cleaned.

Figure 5.The resulting
strip down of the board in Figure 4. Showing how far
the electrolyte had travelled and components needing to be removed (The EPROM
was removed to allow for custom chip)
The
cleaning and tracking down of the extent of damage is a time consuming and
laborious task, and as you can see the electrolyte even went under the aluminium
heat sink that the main injector transistors are bolted to.
Once you
have found how far the electrolyte has gone, cleaned the board and associated
components - the next and possibly most difficult task - is to rebuild the board
by replacing any damaged and destroyed tracks and components.
Now picture
this…
Try holding onto the component in Figure 3. andlining it up, bringing a soldering iron with a tiny drop of solder down to solder one of those tiny pins into place. Now to make even more fun… too much heat and you burn and lift the track you are trying to solder to off the board. Too little heat, solder or a bit of corrosion and you won’t make a good solder joint, the ECU wont work or even worse it will fall off onto the floor and disappear at the first chance it gets….Too much solder and you short together tracks and create more problems. Hours of fun (especially for those who think it will be a quick job). In this case over 6 hours was spent repairing the “Little Bit” of damage.
Why you shouldn’t try to do it yourself and why your average TV repairman can’t do it!
No disrespect to TV repairmen, oops sorry TV repair persons, they are experts in there field and are knowledgable about how to repair TV’s and other AV equipment.
When it comes down to it, if your TV packs it in on you, you aren’t 150Km
from the nearest point of call and your whole life isn’t thrown into turmoil
because it won’t switch on.
The same can’t be said for when your car stops. The inconvenience of a car that won’t run and having to put up with the public transport system (if it will get you to where you need to go, when you need to get there), or bumming a lift with family or friends, ain’t fun. Just shows the cost of a “cheap” repair to an ECU can be quite expensive.
Figure
7.A close up of the ECU shown
in Fig.6 shows some of the damage done by not properly repairing the ECU. As you
can see the transistor array has completely blown
apart.
Figures 6. & 7. shows what can happen when short cuts are taken in the
repair. In figure 6 it can be seen that the capacitors have been replaced and
the job was done neatly. Figure 7. shows what happened after the ECU was put back
into the car. Unfortunately for the owner there was still a fault that remained
undiagnosed by the person who diligently replaced the capacitors. What was that
I hear ‘I took it to this guy and now it doesn’t work…’, well, well if it isn’t the old “Lame Excuse” which brings
me around to the tricky little bug I mentioned before “Dirty
Fingers”.
What happens when you try to put a “Chip” in and things go wrong!
Most DIY experts will tell you that it’s easy to replace capacitors and
what the hell, while your there why not whack a socket into the board so you can
chip it up.
Well have you have seen the results of some of what can go wrong?
What’s that I hear you say, ‘It wont happen to me!’, another favorite
“Lame Excuse” used by “Dirty Fingers” to lull themselves into a false sense of
security.
‘There are hundreds of websites that tell me exactly what to do. What can
go wrong?’
What the web sites generally don’t tell you is what not to do. This is
where most “Dirty Fingers” get them selves into trouble.
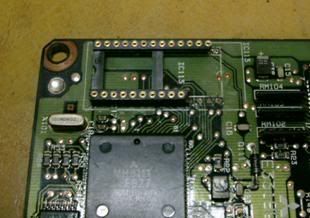
In Figure 8. below is a classic case of “Dirty Fingers” getting them selves into trouble.The ECU in Fig 8. & 9. was being “chipped” by an amateur who managed to remove the EPROM but installed the socket back to front. Then realising their mistake tried to remove the socket and put it in the right way around, and in the process breaking the socket and tearing tracks off the board. Effectively destroying a perfectly good Auspec VR4 ECU.Did I hear a groan of disbelief. Also notice that no attempt was made to replace the original capacitors.
It takes years of experience and thousands of dollars worth of equipment to repair and test ECU’s properly and to be able to offer warranties – what I show you in the photos are just a mere percentage of some of the hundreds of units. The faults including “Dirty Fingers” are unfortunately a lot more common than you would estimate.
Thus remember the best and most economical way to go is to ‘get it repaired right the first time’ and pay for peace of mind.
The automotive repair market is competitive and price conscious, “cheap”
repairs often undercut legitimate (more expensive) quality repairs by giving the
consumer questionable workmanship and ultimately higher costs in the long
term.
So next time you need to get an ECU fixed don’t leave it to late, don’t
try and fix it yourself or get a ‘cheap fix’ and you won’t need to complain
about the price.
E943
ECU
Repairer